Managing Users
This page is about portal users—the people who sign in to your published customer portal. It does not cover workspace teammates (Builders and Members); see User Types for those roles.
Which table is the users table?
You choose which table holds portal logins—often something like Customers, Clients, or Staff—in Portal Settings → Permissions (users table and email/name field mapping). You can also ask the AI agent to configure it.
That table's rows and fields are part of your app data. You work with the schema in Data (agents sidebar): add fields, relations, and views the same as any other table. The portal users view in Portal Settings → Usersdoes not replace the data grid—it's a dedicated screen for login activity and impersonation on the table you selected as your users table.
To shape what appears on user profiles and which fields portal users can see or edit, see User Fields.
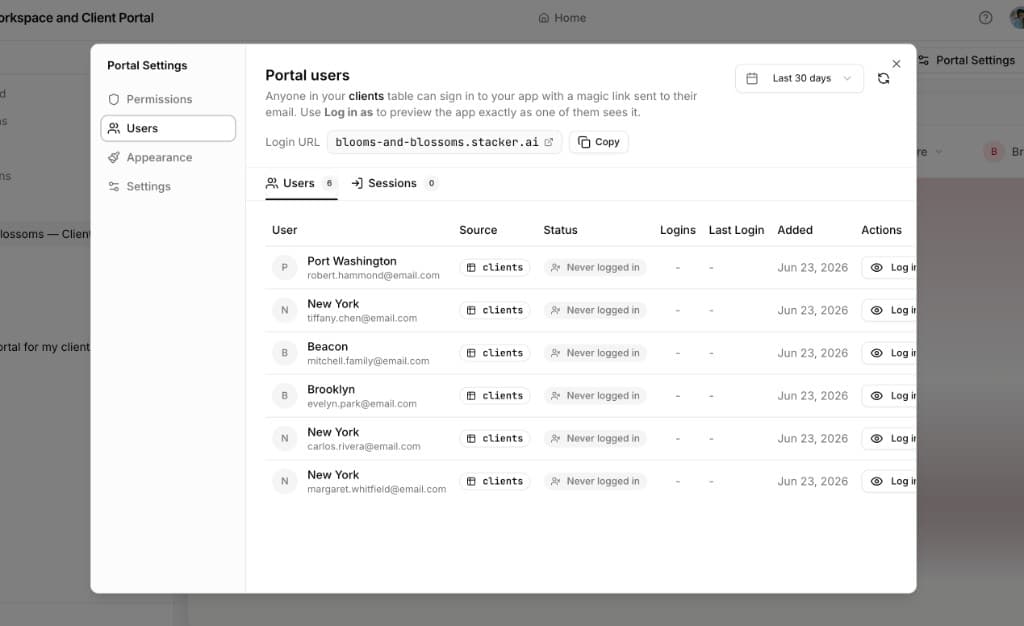
Portal Settings → Users
Use the portal users view to see everyone in your chosen users table who can access the portal and—when they have signed in—login activity. If you use open sign up, new self-registered people appear here as they join.
To open it: select the portal under Portals in the agents sidebar (or use its app-navigation item), then click Portal Settings in the preview toolbar, then choose the Userstab. If you have multiple portals, pick the one you want first—the view always reflects that portal's users table and login activity.
At the top you'll find the Login URL for sharing the portal. Each row includes a Log in as action so you can open the portal as that user and verify permissions and pages.
See how people sign in
User login flow covers how people authenticate (magic links, OTP, registration) and how to view the public login screen as visitors see it—including Preview as → No logged in user—so you can adjust copy and layout with the AI agent. Jump to see the login flow options.
Adding and updating portal users
Data grid
Use Data in the agents sidebar when you want the full table editor: add columns, run imports, and edit many portal-user rows in a spreadsheet-style view. This is the usual place for bulk work on the same table you configured as the portal users table in Portal Settings → Permissions.
Steps (data grid)
- Open Data in the agents sidebar.
- Select your portal users table (the table linked under Portal Settings → Permissions).
- Use Add record or click a row to edit. Fill the mapped email field and any name or custom fields each person needs.
- For many rows at once, use import or paste from a spreadsheet from this grid (see also Importing).
- Save changes. Sign-in works when permissions and row rules allow that user (see Permission Overview).
App pages
Your app's own pages can expose table views for day-to-day edits. Open the portal users table from the main navigation when you need a dashboard-style view instead of the Data grid—handy for quick record updates without touching schema or imports.
Steps (app pages)
- Open your app from the workspace (the main portal experience your team uses).
- Navigate to the page that lists your portal users table (or the table you set as the portal users source).
- Create a record or open an existing one. Set the email and other required fields so the person can receive magic links or OTPs.
- Save the record. The person can use the portal once your portal settings and data rules allow them access.
Portal UI
If your portal pages expose a create or edit experience for end users, people can be added or updated through that UI as well—depending on how you built those screens.
Steps (portal UI)
- Open your portal in preview or visit the published portal URL.
- Go to the page where you added a form, list action, or flow that creates or edits user records (for example self-serve profile or registration).
- Fill in the fields and submit—same as an end user. The record is stored in the underlying table your UI is bound to.
- If nothing appears, you may need to add or adjust those screens with the AI agent or builder tools first.
What you can use as your user list
Upload a list
You can bring in a pre-existing list (for example via CSV import) into the users table from the data side of the product, so many portal users exist at once with the right fields.
Connected sources
If your users (or contacts) already live in a connected data source, you can keep that table in sync so portal users stay aligned with your system of record. See Data Sync for connectors and behavior.
Email is required to sign in
The field you map as the user's email in Portal Settings → Permissions must be filled in for that row. Portal login (magic link, OTP, etc.) is tied to that address—without it, the person cannot be treated as a portal user or complete sign-in.
Which records a portal user can access still follows your per-table data permissions; see Permission Overview and Which records users see.
Tip: Use Log in as in Portal Settings → Users to confirm each user only sees the rows and pages you expect.